
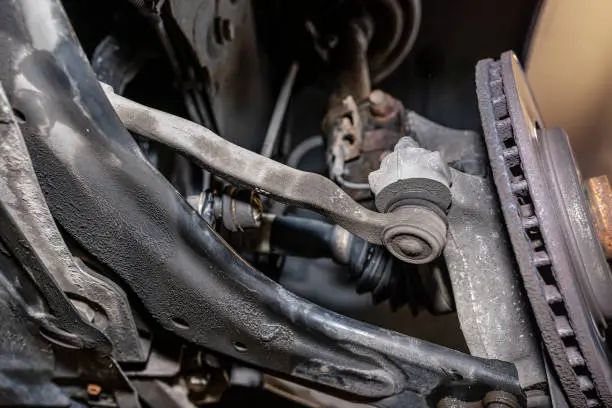
In the aftermarket, the Stabilizer Link (also called Sway Bar Link or End Link) is one of the most frequently replaced suspension components. Many repair shops treat it as a “quick swap”: remove two bolts, install the new part, and you’re done in 10 minutes.
But real-world comeback data shows that nearly 90% of cases where the noise returns or the part loosens within a month are NOT due to part quality—they’re caused by improper installation.
A 2023 service report from a regional quick-lube chain revealed that out of 127 Sway Bar Link replacements that required rework, 112 were traced directly to installation errors. Among them, the following three mistakes are the most common—yet the easiest to overlook.
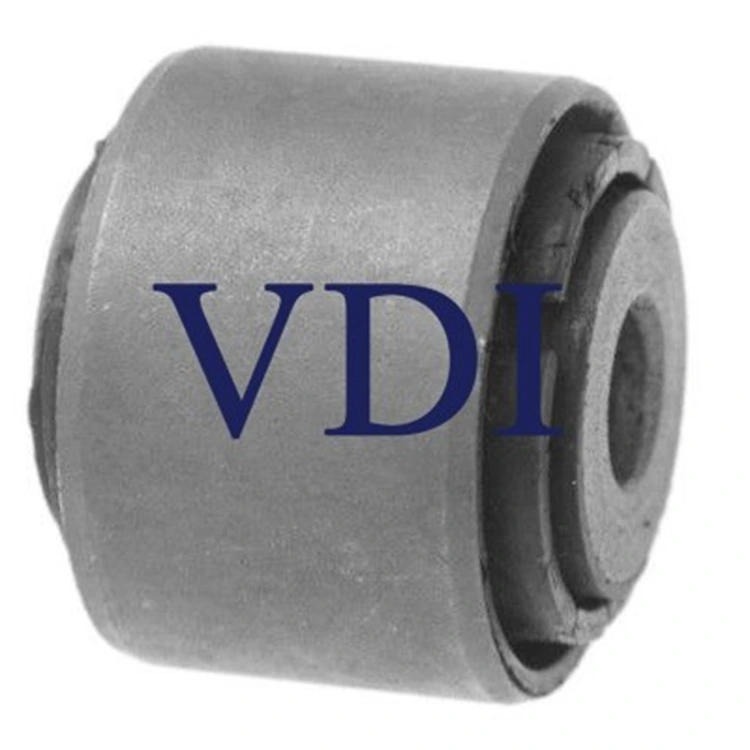
Note: Take common German vehicles as an example—if you’re replacing a Stabilizer Link 1J0411315H (used on Volkswagen Golf, Jetta, Audi A3, and other MQB-platform front suspensions), strict adherence to installation procedures is critical. Despite its small size, this part is a key serviceable component of the Stabilizer Bar Assembly.
Mistake #1: Torquing the Bolts While the Vehicle Is Still on a Lift
This is the most hidden—and most damaging—error.
The Stabilizer Link is engineered to operate under zero preload when the vehicle is at curb weight and the suspension is in its normal static position. If you fully torque the bolts while the car is lifted (with the suspension fully extended), the link becomes pre-loaded once the vehicle is lowered. This forces the rod into constant tension or compression, creating sustained internal stress.
Consequences:
Ball joint subjected to off-axis bending loads
Abnormal wear between ball stud and bushing—leading to clunking noise within 3–6 months
In severe cases, cracked ball joint housing or bent link rod (e.g., on Stabilizer Link 1J0411315H)
✅ Correct Procedure:
1. Install the new link (e.g., VDI Stabilizer Link 1J0411315H) and snug the bolts by hand or with a standard wrench (do not torque yet)
2. Lower the vehicle so all four tires are fully on the ground
3. Pump the brake pedal 3–5 times to settle the suspension to its normal ride height
4. Use a torque wrench to final-torque the bolts to OEM spec (e.g., 55 N·m)
Note: Some Japanese models (e.g., Toyota Camry) explicitly state in their service manuals: “Tighten with vehicle at curb weight.”
Mistake #2: Using an Impact Wrench (“Air Gun”) for Final Torque
To save time, many technicians use a pneumatic impact wrench (air gun) to tighten Stabilizer Link bolts. It seems fast—but it’s a ticking time bomb.
The standard torque spec for Stabilizer Link bolts is typically 45–60 N·m (varies by vehicle). But an impact wrench delivers spikes of 150+ N·m instantly, which can easily cause:
Bolt stretching or loss of clamping force
Crushed ball joint housing, leading to seal failure
Stripped threads—making future removal impossible (especially problematic for Stabilizer Bar Assembly serviceability)
✅ Correct Practice:
Always use a click-type torque wrench
Apply two-step torque: e.g., first to 30 N·m (snug), then to 55 N·m (final)
Verify that bolts/nuts include locking features: such as nyloc nuts, cotter pin holes, or toothed flange surfaces
If the OEM specifies a one-time-use bolt, always replace it (common on German vehicles)
Mistake #3: Replacing Only One Side to “Save Half the Cost”
Customers often ask: “The left side is bad, but the right looks fine—can I just replace one?”
The answer is clear: No.
Stabilizer Links must work as a matched pair. Left and right links must have identical stiffness, length, and ball joint damping. Mixing old and new causes:
Slight pulling during straight-line driving
Asymmetric body roll in corners—making handling feel “odd” or “unbalanced”
40%+ reduction in service life of the new link due to uneven load sharing
✅ Industry Best Practice:
Always replace both left and right links together, regardless of the condition of the other side
Distributors should default to selling links in pairs (e.g., VDI Stabilizer Link 1J0411315H left + right kits)
Premium brands like VDI use batch-consistent manufacturing to ensure perfect pair matching—preventing imbalance in the entire Stabilizer Bar Assembly
Real-world case: A customer replaced only one Sway Bar Link. Within two weeks, the car pulled to one side. Inspection revealed 0.5 mm of play in the new ball joint—far beyond normal wear rates.
Special Note: Some Vehicles Require Special Tools
On certain German models (e.g., VW MQB, BMW F30, Mercedes W205), the Stabilizer Link is integrated with the strut mount or subframe, leaving minimal access and awkward bolt angles. Forcing generic tools often leads to:
Stripped bolt heads or rounded corners
Damaged nearby wiring harnesses or brake lines
Incorrect installation angle—compromising Stabilizer Bar Assembly performance
✅ Recommendations:
Always consult model-specific service procedures (e.g., ISTA, ElsaPro)
Use OEM-approved special tools (e.g., VW tool T10020 series)
Do not attempt DIY removal—leave it to certified technicians, especially when working on precision parts like Stabilizer Link 1J0411315H
Installation Is Responsibility
The Stabilizer Link may be small—but if installed wrong, it’s as good as not replaced at all.
l For repair shops: proper installation is the key to reducing comebacks and building trust
l For vehicle owners: understanding these pitfalls helps avoid wasted money and repeat repairs
Remember: Replacing the part is easy—installing it correctly is what keeps you safe.
And what you’re really replacing isn’t just a Stabilizer Link—it’s the foundation of your entire Stabilizer Bar Assembly’s stable, reliable performance.